This guide is intended to walk you through the entire flashing preparation, flashing process and outline all necessary hardware requirements.
...
4. Vehicle requirements and preparation for flashing:
THE FOLLOWING INFORMATION BELOW IS VERY IMPORTANT
4.1 Vehicle preparation
The following conditions must be fulfilled when flashing the ECU in the car and will facilitate a safe flashing environment with the least risk of failure.
...
Ensure your car have a well charged battery and furthermore one that is in good condition. We ask that if you have any outstanding concerns with the charging system of your car that you rectify these concerns before proceeding any further with any flashing procedure. Connecting your car to battery charger is highly recommended especially during the first flash (flashing time 4 – 6 minutes). After the initial setup OTS map flashes will take 15 -30 seconds. and will not require charger, however, we still highly recommend it. The charger should be connected to the designated charging points in the engine bay which can be found in your BMW User Manual. The Flasher is intuitive in the sense that it knows when the car battery is low and once it detects a low battery condition it will abort/prevent a start of the flash procedure. It is very important to keep the car battery within optimal voltage during flashing; we are not responsible for any damage to the ECU during flashing if above requirements are not met.
Make sure to turn off the radio, headlights, interior lights, AC/heating, heated seats as these are all electrical components that draw power from the battery. If you have installed any aftermarket components make sure to turn them off or disconnect them, this includes any piggyback hardware such as a JB4, which cannot be run in tandem with our software anyways.
Fasten the driver’s seat belt into its’ buckle as this will prevent the ignition from shutting off during the flashing process if you were to intentionally or unintentionally open or close your door.
If equipped, disable/turn off the in-car Wi-Fi hotspot.
...
Switch your device to Airplane mode and close any other running applications, as a phone call or any other application activity could interrupt the flashing procedure. For the initial flash procedure, connect vehicle to the charger as it will take 4 – 6 minutes. Each flashing procedure, after activation/unlock will take 15 -20 seconds and a car charger is not required.
Fasten the driver’s seat belt into its’ buckle as this will prevent the ignition from shutting off during the flashing process if you were to intentionally or unintentionally open or close your door.
Turn the ignition ON by pressing the START button twice without touching the brake.
Start MG Flasher, and after the splash screen click “Connect”. Shortly after a successful connection, the main screen will show up with your car’s information: model, VIN, engine and actual status of the ECU: inactive or active following with actual stage installed (Stage 1, Stage 2, Stage 3, Stock)
...
5.4 Activate/unlock the ECU flashing procedure
Following conditions must be fulfilled when flashing ECU in the car, it will help to avoid flashing failures
Ensure you have a well charged battery and furthermore one that is in good condition. We ask that if you have any outstanding concerns with the charging system of your car that you rectify these concerns before proceeding any further with any flashing procedure. Connecting your car to a battery charger is highly recommended especially during the first flash (flashing time 4 – 6 minutes). After the initial setup any next OTS Stage Flashing will take up 15 -20 seconds and will not require charger however still highly recommended. The charger should be connected to the designated charging points in the engine bay which can be found in your BMW User Manual. MG Flasher is intuitive in the sense that it knows when the car battery is low and once it detects a low battery condition it will abort/prevent a start of the flash procedure. It is very important to keep the car battery within optimal voltage during flashing; we are not responsible for any damage to the ECU during flashing if above requirements are not met.
Make sure to turn off the radio, headlights, interior lights, AC/heating, heated seats as these are all electrical components that draw power from the battery. This is extremely important for the first long flash. If you have installed any aftermarket components make sure to turn them off or disconnect them, this includes any piggyback hardware such as a JB4, which cannot be run in tandem with our software anyways.
Fasten the driver’s seat belt into its’ buckle as this will prevent the ignition from shutting off during the flashing process if you were to intentionally or accidently open or close your door
If equipped, ensure to disable/turn off the in-car Wi-Fi hotspot
Switch your device to Airplane mode and close any other running applications, as a phone call or any other application activity could interrupt the flashing procedure. For the initial flash procedure, connect vehicle to the charger as it will take time 4 – 6 minutes. Each flashing procedure, after activation/unlock will take 15 -20 seconds and a car charger is not required.
Turn ignition ON by pressing the START button twice without touching the brake.
Select “Activate” button – a warning screen will appear to remind you about all vehicle and hardware condition/prerequisites to be checked – if all met you may confirm by “Flash”

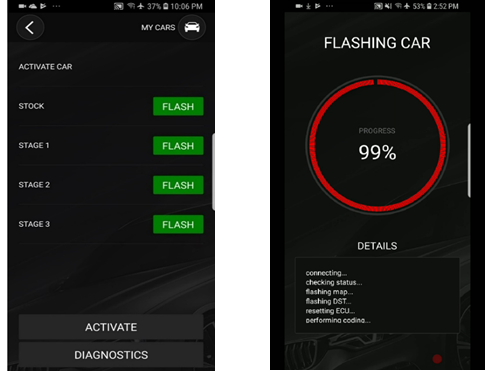
Activation flashing procedure will start, a progress bar will show you how far along the process is. During the procedure there will be error messages showing up on the car’s display and sounds from the dash which is normal.
Wait for the success message to appear then you may turn the ignition off, wait 15- 30 second, turn ignition ON and start the car. Congratulations, your ECU is unlocked!
...
Option 1: Lifting the limiter in the transmission ECU which can be done for example with xHP Flashtool
Option 2: Bringing the car to our shop or another tuner for reprogramming of the transmission ECU limiters
Products offered are available for closed course competition use only
...
• SPORT+ = Slot #4 (4000 RPM)
• SPORT or SPORT+ and 2 quick MSA presses = Slot #0 (0 RPM) (Default)
Important! when switching to Slot #0 (default) after rpm gauge switch to 0 RPM you must release gas pedal within 5 seconds , if you hold it for longer time the ecu will switch to Slot #4
In case your BMW does not have SPORT+ mode you will be limited to Slot #1, #2, #3 and reverting to Slot #0 is possible from SPORT mode by the same sequence - SPORT and 2 quick MSA presses
Within the 5 seconds of holding the Gas Pedal at W.O.T position (while still holding the Brake Pedal) you will notice the RPM on the dash will reflect the choice you have selected (ie. 3000 RPM = Slot #3).
...
The car must be running for this function to work.
The car must have been running for longer than 30s to begin selecting as described below.
The car must be above 50-degree coolant temperature for burbles to activate.
Drive Mode must be enabled; manual mode deactivates the selection process.
You must press the MSA button the required number of times within 2.5 seconds for it to be a valid selection.
The burble level adjusted by the Aggressiveness Slider during your last OTS map flash will be the default aggressiveness adjustment without any of the above-mentioned selections. This "default" mode will be activated each time when vehicle is started after sleep mode.
CEL will brink twice quickly when enabled and solid when default settings are restored.
...
Level 1 - Switch to ECO Mode via the Driver Experience Switch and push the MSA button four times within 2.5 seconds. The Check Engine Light will blink twice as the confirmation. Then you must return to Sport Mode or Sport Mode+ to hear the changes. This level will be equivalent to the aggressiveness at 20%.
Level 2 - Switch to Comfort Mode via the Driver Experience Switch and push the MSA button four times within 2.5 seconds. The Check Engine Light will blink twice as the confirmation. Then you must return to Sport Mode or Sport Mode+ to hear the changes. This level will be equivalent to the aggressiveness at 40%.
Level 3 - Switch to Sport Mode via the Driver Experience Switch and push the MSA button four times within 2.5 seconds. The Check Engine Light will blink twice as the confirmation. The changes should be heard immediately, given that you are already in Sport Mode, where burbles are active. This level will be equivalent to the aggressiveness at 70%.
Burble OFF - Switch to Sport Mode+ via the Driver Experience Switch and push the MSA button four times within 2.5 seconds. The Check Engine Light will blink twice as the confirmation. Burbles will now be fully deactivated.
Default Mode – To switch back to your stock/default settings (aggressiveness level depends on your slider positions) in any Mode (ECU, Comfort, Sport, Sport+) and push the MSA button six times within 2.5 seconds. The Check Engine Light will blink solid as the confirmation.
NOTE: All Gen 2 “on-the-fly" options are in development, however, can be adjusted just before a reflash (15 -20 second when using ENET).
10. Max Cooling On-The-Fly (our unique custom code)
...
To enable Max Cooling On-The-Fly – Sport Mode+ or Sport Mode via the Driver Experience Switch and push the ESP button four times within 2.5 seconds. The Check Engine Light will blink twice as a confirmation.
To disable Max Cooling On-The-Fly – Sport Mode+ or Sport Mode via the Driver Experience Switch and push the ESP button four times within 2.5 seconds. The Check Engine Light will blink once as a confirmation.
...
NOTE: All Gen 2 “on-the-fly" options are in development, however, can be adjusted just before a reflash (15 -20 second when using ENET).
11. Diagnostic
This segment is dedicated for diagnosis, troubleshooting, reset adaption, restore coding, restore backup It contains following modules:
ECU info – all information regards ECU software and coding.
Read DTC – read all supported codes from the ECU with their description for troubleshooting.
Clear DTC.
Reset ECU.
Reset adaptation - select to reset various adaptations such as mixture adaptation, VANOS, fuel system, Valvetronic Lift and increment wheel.
Restore coding – when the original coding is lost or corrupted or during the flashing was not performed you can restore coding manually. Go to “ECU info” to check coding status. Check the last position on the list example CAFD.X.X.X.
Restore backup – flash/restore complete backup, uninstall MG Flasher and relock ECU. It will lock your ECU and increase flashing counter - flashing time 4 minutes.
Do not use this function unless allowed by our support!
12. Logger
This section of MG Flasher allows you to log real time data and plot them into graphs for troubleshooting and optimizing. Logger is additional function available in MG Flasher. You can get Logger as additional product once Flashing license is already activated.
If you select logging from the main screen, you will be presented with an option to start/stop a log
Auto logging function – when you press “Auto ON” logger will automatically start logging while you press the accelerator pedal faster which and stop logging when the pedal will be released for longer than 2 seconds
Data settings - select add/remove the data that needs to be logged from available submenu list – default data is already preset with main parameters required by us if support needed.
After stopping the logging process, the logs will be stored under view log

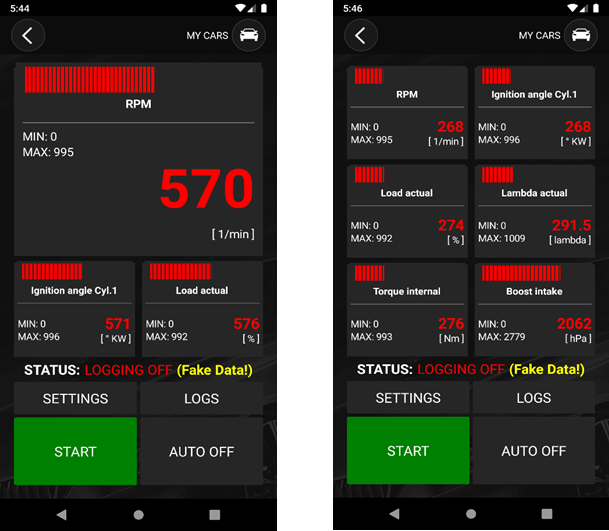
Data will be saved to *.csv format and can be exported or share for viewing and analyzing in different software or applications – diagram plotting in MG Flasher App will be added with further updates soon.
...
Don’t panic, just retry the unlock/activate flashing procedure again. MG Flasher is designed to keep programming process of your ECU safe, it will perform proper programming steps and correct errors
14. Terms and conditions
Access to MG Flasher and its use is governed by the terms and conditions set out below. JR Auto Performance Inc. reserves the right to make changes to the application and these Terms at any time. These Terms and Conditions can override terms and conditions included within application. By accessing this app and webpage, you agree that you have read and consent to be bound not only to this Agreement, but also to the Privacy Policy.
MG Flasher (referred as “application”) is owned and operated by JR Auto Performance Inc. (referred as "we", "us" or "our"). The term "you” refers to the user of MG Flasher.
The application name and its contents including, but not limited to logo, name, intellectual properties, graphics, text are trademarked, owned and copyrighted by JR Auto Performance Inc. The use or misuse of this trademark or any other contents distributed via MG Flasher, except as provided in these Terms, is strictly prohibited.
MG Flasher supposed to be used only for personal non-commercial purposes. Upon purchase you will receive license to use under these terms and conditions. You hereby agree not to modify, copy, reproduce, publish, transmit, distribute, transfer or sell any information or content included in the system, software, products, or services obtained from or available as part of or in connection with this application. Including, but not limited to, the text, graphics, audio and visual content, and code. You agree not to resell, rent, sub-license or transfer any gathered data under this agreement, any products purchased under this Agreement, nor to transfer any of your rights here under without the prior written consent of JR Auto Performance Inc. We reserve all rights to terminate accounts, edit or remove content and cancel activations at our sole discretion.
Privacy policy
This Privacy Policy applies to MG Flasher application and website and governs data collection and usage. By using MG Flasher, you consent to the data practices described in this statement.
JR Auto Performance Inc. is committed to protecting your privacy and developing technology that gives you the most powerful and safe online experience. Personal Information will only be used for the purpose for which it was collected and will not be disclosed without your consent, except when permitted or required by law. This information can include name, address, email address, user IP addresses in situation where they have not been deleted, telephone number. Such information is only collected from if you submit it to us, collected upon registration, use of application, email subscription, browsing the app. We collect information necessary for the operation and to maintain quality, deliver the services you have requested and communicate with you in the future. You hereby consent to receive communication from JR Auto Performance Inc. to conduct research about your opinion of current services and new products, services and promotions. We may sometime contact you on behalf of our external business partners about an offering that may be of interest to you, but no personal information is transferred, sold or disclosed to the third party.
Accessing this app and/or website, you accept fact that information and electronic mail passing over the Internet may not be free from interference by third parties. We cannot guarantee the privacy of information you are passing over the internet. The user shall be responsible for the content of all communications to this app and/or website, including its lawfulness and accuracy.
You can withdraw your consent to the processing of your personal data at any time. The withdrawal of consent to the processing of personal data does not affect the legality of the processing made based on your consent before its withdrawal. Submit your withdrawal request to the following address: info@MGFlasher.com
Disclaimer of warranties and limitation of liability
Neither we nor any third parties provide any warranty or guarantee as to the accuracy of the information and materials found or offered within this app. We exclude liability for any such inaccuracies or errors. Use of any information or products within this app is at your own risk, for which we shall not be liable. JR Auto Performance Inc. disclaims any warranties with regards to this application and your purchase of any products hereunder. You expressly acknowledge and agree that use of the licensed application, the materials and services in the application are provided “As Is” and ”As Available”, JR Auto Performance will not guaranty or make any representations regarding the use of, or the result of the use of, the material in the application in terms of their, accuracy, reliability. It is your own responsibility to ensure that any products, services or information available through this app meet your specific requirements. We are not responsible for the contents of any links provided to third party web sites. You acknowledge that such information and materials may contain inaccuracies or errors or that the application or the server that makes it available are free of viruses.
Products offered within MG Flasher are for use only in competition closed course driving and may not be legal for “on highway use”. JR Auto Performance Inc does not guarantee legality of any software used on street driven vehicles. It is customer responsibility to check local low before purchasing and installing a product. We are not responsible for any fees and fines received by customer due to failing to check compliance with local law before purchasing and installing a product. Some items used and/or installed by MG Flasher may void portions of your vehicle’s factory warranty and JR Auto Performance Inc. will not be held liable. Damages caused by modifications, improper installations or improper use are not our responsibility. We are not responsible for a repair costs, liabilities and damages occurred. Performance software modification may involve risks like performance loss, engine failure, transmission failure, fire, personal injuries (including all people travelling in the customer vehicle) JR Auto Performance Inc. is not responsible for those risks. By submitting activation customer acknowledge he read and understands this document and agree to be bound by its terms and would like to proceed with modifications.
Indemnification
You agree to indemnify, defend and hold harmless (including legal fees) JR Auto Performance Inc., its officers, directors, employees against and from any action arising from product installation, your misuse of this product or the breach of any of the provisions of this Agreement. MG Flasher, any use of this application and any dispute relating thereto to or to the products purchased therein shall be governed and construed by the laws applicable to the Province of Ontario, without regard to conflict of law rules. Both JR Auto Performance Inc. and you agree to the exclusive jurisdiction of the Province of Ontario.
...
As the terms of this Agreement may be modified at JR Auto Performance Inc. sole discretion, without any obligation to notify you, we advise that from time to time you check this chapter to review the changes. Your continued use of this app and webpage shall constitute your consent to any changes. Any changes to these Terms and conditions between JR Auto Performance Inc. and you must be presented and signed by both parties. Any inquiries, complaints or questions regarding this policy should be directed in writing to JR Auto Performance Inc.
Contact information
MG Flasher