This guide is intended to walk you through the entire flashing preparation, flashing process and outline all necessary hardware requirements.
...
4. Vehicle requirements and preparation for flashing:
THE FOLLOWING INFORMATION BELOW IS VERY IMPORTANT
4.1 Vehicle preparation
The following conditions must be fulfilled when flashing the ECU in the car and will facilitate a safe flashing environment with the least risk of failure.
...
Ensure your car have a well charged battery and furthermore one that is in good condition. We ask that if you have any outstanding concerns with the charging system of your car that you rectify these concerns before proceeding any further with any flashing procedure. Connecting your car to battery charger is highly recommended especially during the first flash (flashing time 4 – 6 minutes). After the initial setup OTS map flashes will take 15 -30 seconds. and will not require charger, however, we still highly recommend it. The charger should be connected to the designated charging points in the engine bay which can be found in your BMW User Manual. The Flasher is intuitive in the sense that it knows when the car battery is low and once it detects a low battery condition it will abort/prevent a start of the flash procedure. It is very important to keep the car battery within optimal voltage during flashing; we are not responsible for any damage to the ECU during flashing if above requirements are not met.
Make sure to turn off the radio, headlights, interior lights, AC/heating, heated seats as these are all electrical components that draw power from the battery. If you have installed any aftermarket components make sure to turn them off or disconnect them, this includes any piggyback hardware such as a JB4, which cannot be run in tandem with our software anyways.
Fasten the driver’s seat belt into its’ buckle as this will prevent the ignition from shutting off during the flashing process if you were to intentionally or unintentionally open or close your door.
If equipped, disable/turn off the in-car Wi-Fi hotspot.
...
Switch your device to Airplane mode and close any other running applications, as a phone call or any other application activity could interrupt the flashing procedure. For the initial flash procedure, connect vehicle to the charger as it will take 4 – 6 minutes. Each flashing procedure, after activation/unlock will take 15 -20 seconds and a car charger is not required.
Fasten the driver’s seat belt into its’ buckle as this will prevent the ignition from shutting off during the flashing process if you were to intentionally or unintentionally open or close your door.
Turn the ignition ON by pressing the START button twice without touching the brake.
Start MG Flasher, and after the splash screen click “Connect”. Shortly after a successful connection, the main screen will show up with your car’s information: model, VIN, engine and actual status of the ECU: inactive or active following with actual stage installed (Stage 1, Stage 2, Stage 3, Stock)
...
5.4 Activate/unlock the ECU flashing procedure
Following conditions must be fulfilled when flashing ECU in the car, it will help to avoid flashing failures
Ensure you have a well charged battery and furthermore one that is in good condition. We ask that if you have any outstanding concerns with the charging system of your car that you rectify these concerns before proceeding any further with any flashing procedure. Connecting your car to a battery charger is highly recommended especially during the first flash (flashing time 4 – 6 minutes). After the initial setup any next OTS Stage Flashing will take up 15 -20 seconds and will not require charger however still highly recommended. The charger should be connected to the designated charging points in the engine bay which can be found in your BMW User Manual. MG Flasher is intuitive in the sense that it knows when the car battery is low and once it detects a low battery condition it will abort/prevent a start of the flash procedure. It is very important to keep the car battery within optimal voltage during flashing; we are not responsible for any damage to the ECU during flashing if above requirements are not met.
Make sure to turn off the radio, headlights, interior lights, AC/heating, heated seats as these are all electrical components that draw power from the battery. This is extremely important for the first long flash. If you have installed any aftermarket components make sure to turn them off or disconnect them, this includes any piggyback hardware such as a JB4, which cannot be run in tandem with our software anyways.
Fasten the driver’s seat belt into its’ buckle as this will prevent the ignition from shutting off during the flashing process if you were to intentionally or accidently open or close your door
If equipped, ensure to disable/turn off the in-car Wi-Fi hotspot
Switch your device to Airplane mode and close any other running applications, as a phone call or any other application activity could interrupt the flashing procedure. For the initial flash procedure, connect vehicle to the charger as it will take time 4 – 6 minutes. Each flashing procedure, after activation/unlock will take 15 -20 seconds and a car charger is not required.
Turn ignition ON by pressing the START button twice without touching the brake.
Select “Activate” button – a warning screen will appear to remind you about all vehicle and hardware condition/prerequisites to be checked – if all met you may confirm by “Flash”

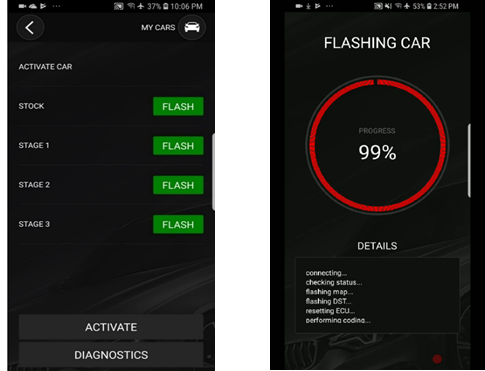
Activation flashing procedure will start, a progress bar will show you how far along the process is. During the procedure there will be error messages showing up on the car’s display and sounds from the dash which is normal.
Wait for the success message to appear then you may turn the ignition off, wait 15- 30 second, turn ignition ON and start the car. Congratulations, your ECU is unlocked!
...
Option 1: Lifting the limiter in the transmission ECU which can be done for example with xHP Flashtool
Option 2: Bringing the car to our shop or another tuner for reprogramming of the transmission ECU limiters
Products offered are available for closed course competition use only
...
• SPORT+ = Slot #4 (4000 RPM)
• SPORT or SPORT+ and 2 quick MSA presses = Slot #0 (0 RPM) (Default)
Important! when switching to Slot #0 (default) after rpm gauge switch to 0 RPM you must release gas pedal within 5 seconds , if you hold it for longer time the ecu will switch to Slot #4
In case your BMW does not have SPORT+ mode you will be limited to Slot #1, #2, #3 and reverting to Slot #0 is possible from SPORT mode by the same sequence - SPORT and 2 quick MSA presses
Within the 5 seconds of holding the Gas Pedal at W.O.T position (while still holding the Brake Pedal) you will notice the RPM on the dash will reflect the choice you have selected (ie. 3000 RPM = Slot #3).
...
The car must be running for this function to work.
The car must have been running for longer than 30s to begin selecting as described below.
The car must be above 50-degree coolant temperature for burbles to activate.
Drive Mode must be enabled; manual mode deactivates the selection process.
You must press the MSA button the required number of times within 2.5 seconds for it to be a valid selection.
The burble level adjusted by the Aggressiveness Slider during your last OTS map flash will be the default aggressiveness adjustment without any of the above-mentioned selections. This "default" mode will be activated each time when vehicle is started after sleep mode.
CEL will brink twice quickly when enabled and solid when default settings are restored.
...
Level 1 - Switch to ECO Mode via the Driver Experience Switch and push the MSA button four times within 2.5 seconds. The Check Engine Light will blink twice as the confirmation. Then you must return to Sport Mode or Sport Mode+ to hear the changes. This level will be equivalent to the aggressiveness at 20%.
Level 2 - Switch to Comfort Mode via the Driver Experience Switch and push the MSA button four times within 2.5 seconds. The Check Engine Light will blink twice as the confirmation. Then you must return to Sport Mode or Sport Mode+ to hear the changes. This level will be equivalent to the aggressiveness at 40%.
Level 3 - Switch to Sport Mode via the Driver Experience Switch and push the MSA button four times within 2.5 seconds. The Check Engine Light will blink twice as the confirmation. The changes should be heard immediately, given that you are already in Sport Mode, where burbles are active. This level will be equivalent to the aggressiveness at 70%.
Burble OFF - Switch to Sport Mode+ via the Driver Experience Switch and push the MSA button four times within 2.5 seconds. The Check Engine Light will blink twice as the confirmation. Burbles will now be fully deactivated.
Default Mode – To switch back to your stock/default settings (aggressiveness level depends on your slider positions) in any Mode (ECU, Comfort, Sport, Sport+) and push the MSA button six times within 2.5 seconds. The Check Engine Light will blink solid as the confirmation.
NOTE: All Gen 2 “on-the-fly" options are in development, however, can be adjusted just before a reflash (15 -20 second when using ENET).
10. Max Cooling On-The-Fly (our unique custom code)
...
To enable Max Cooling On-The-Fly – Sport Mode+ or Sport Mode via the Driver Experience Switch and push the ESP button four times within 2.5 seconds. The Check Engine Light will blink twice as a confirmation.
To disable Max Cooling On-The-Fly – Sport Mode+ or Sport Mode via the Driver Experience Switch and push the ESP button four times within 2.5 seconds. The Check Engine Light will blink once as a confirmation.
...
NOTE: All Gen 2 “on-the-fly" options are in development, however, can be adjusted just before a reflash (15 -20 second when using ENET).
11. Diagnostic
This segment is dedicated for diagnosis, troubleshooting, reset adaption, restore coding, restore backup It contains following modules:
ECU info – all information regards ECU software and coding.
Read DTC – read all supported codes from the ECU with their description for troubleshooting.
Clear DTC.
Reset ECU.
Reset adaptation - select to reset various adaptations such as mixture adaptation, VANOS, fuel system, Valvetronic Lift and increment wheel.
Restore coding – when the original coding is lost or corrupted or during the flashing was not performed you can restore coding manually. Go to “ECU info” to check coding status. Check the last position on the list example CAFD.X.X.X.
Restore backup – flash/restore complete backup, uninstall MG Flasher and relock ECU. It will lock your ECU and increase flashing counter - flashing time 4 minutes.
Do not use this function unless allowed by our support!
12. Logger
This section of MG Flasher allows you to log real time data and plot them into graphs for troubleshooting and optimizing. Logger is additional function available in MG Flasher. You can get Logger as additional product once Flashing license is already activated.
If you select logging from the main screen, you will be presented with an option to start/stop a log
Auto logging function – when you press “Auto ON” logger will automatically start logging while you press the accelerator pedal faster which and stop logging when the pedal will be released for longer than 2 seconds
Data settings - select add/remove the data that needs to be logged from available submenu list – default data is already preset with main parameters required by us if support needed.
After stopping the logging process, the logs will be stored under view log

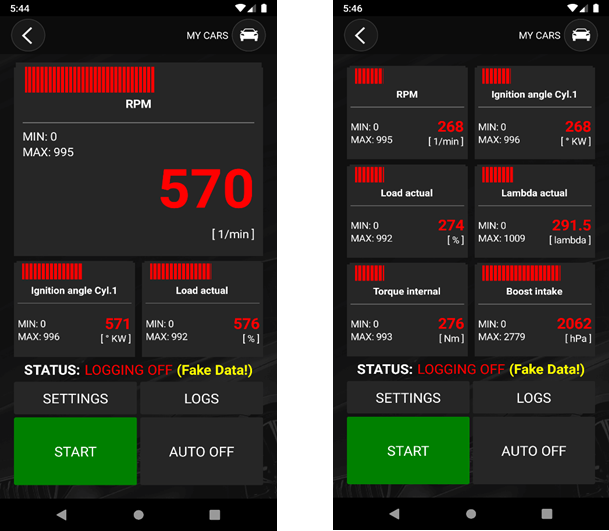
Data will be saved to *.csv format and can be exported or share for viewing and analyzing in different software or applications – diagram plotting in MG Flasher App will be added with further updates soon.
...