This guide is intended to walk you through the entire flashing preparation, flashing process and outline all necessary hardware requirements.
1. Supported vehicles
MG Flasher is an application dedicated to bringing flashing/tuning options for BMW cars equipped with the Gen 1 & 2 B46/B48/B58 engines and will be continuously updated/developed.
List of supported models:
B46/B48 | B58 |
|---|---|
BMW 120i/125i/M135i F20/F40 | BMW M140i F20/F21 |
BMW 220i/225i/230i/228i/M235i F22/F44 | BMW M240i F22/F23 |
BMW 318i/320i/330i/330e F30/F31/F34/G20/G21/G28 | BMW 340i/M340i F30/F31/F34/G20 |
BMW 420i/430i F32/F33/F36/G22 | BMW 440i/M440i F32/F33/F36/G22 |
BMW 520i/530i/530e G30/G31/G38 | BMW 540i G30/G31 |
BMW 630i G32 | BMW 640i G32 |
BMW 730i/730Li/740e/740Le G11 | BMW 740i/740Li G11/G12 |
BMW X1 20i/25i/28i F48 | BMW 840i G14/G15/G16 |
BMW X2 20i/25i/28i/M35i F39 | BMW X3 M40i G01 |
BMW X3 20i/30i G01 | BMW X4 M40i G02 |
BMW X4 20i/30i G02 | BMW X5 40i G05 |
BMW Z4 20i/30i G29 | BMW X6 40i G06 |
Toyota Supra J29 | BMW X7 40i G07 |
BMW Z4 M40i G29 | |
Toyota Supra J29 |
Please note that our MG Flasher will only work with the current list of supported vehicles developed by our team. The application will check support automatically during the initial connection to your car and our server database (more info in “Checking support via MG Flasher” section). Make sure to subscribe to our email newsletter on the main website or follow us on social media to stay up to date on supported vehicles.
2. Required hardware
Android and iOS users
Android 7.1, iOS 10.0 or newer operating system
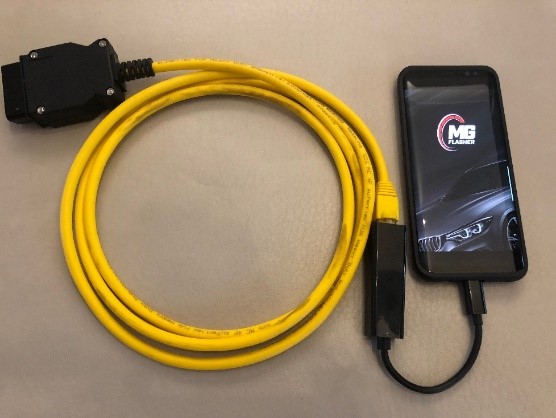
ENET Wi-Fi adapter or ENET cable – It is strongly recommended to use ENET Wi-Fi connection for its fast speed and to reduce the risk of cables disconnecting
Ethernet to USB adapter if using ENET cable
Check with the device’s manufacturer if your device is compatible with ethernet connectivity through a USB - Ethernet adapter for ENET cable support. Alternatively, if you are using an ENET Wi-Fi adapter, ensure your device has Wi-Fi connectivity. Here is a convenient table of requirements depending on the connectivity method you choose:
ENET | Wi-Fi |
|
|
|
|
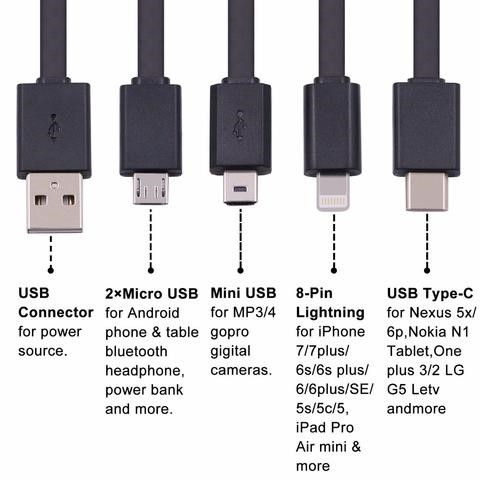
Choose Micro-USB or USB-C adapter to match your device
NOTE: The Micro-USB plug was replaced on modern devices with USB Type C. Determine which of these two plugs is appropriate for your device and purchase any required adapters with the correct interface.
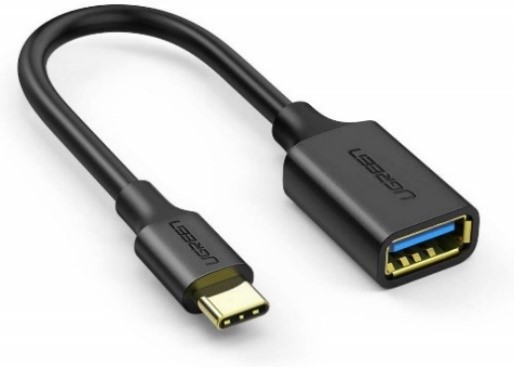
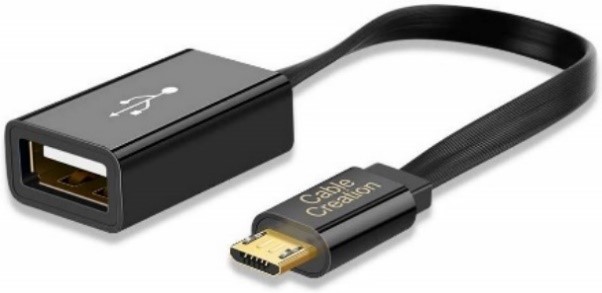
Left: Micro USB – OTG adapter. Right: USB Type-C OTG adapter.

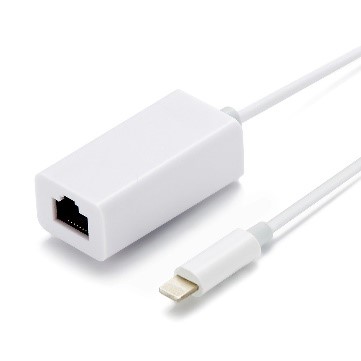
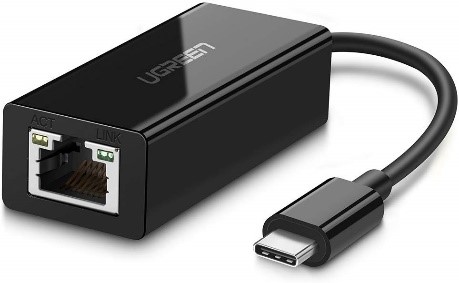
Left: Micro USB – Ethernet adapter. Middle: Lightning – Ethernet adapter. Right: USB Type-C – Ethernet adapter.
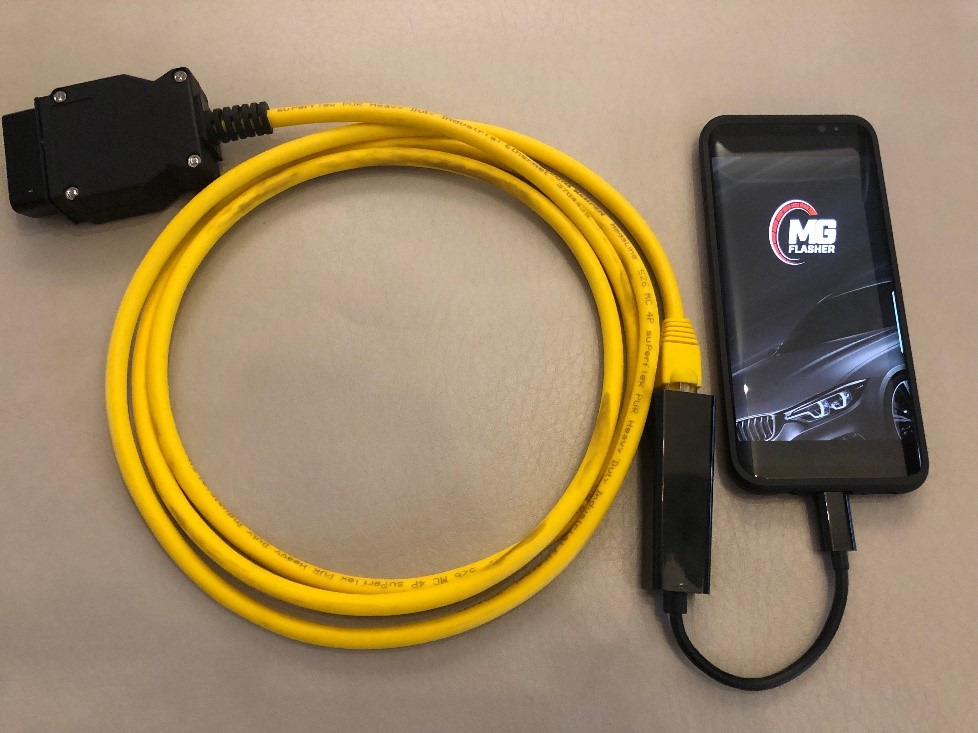
ENET cable (connected through an ethernet adapter to a phone)

MG Flasher’s ENET Wi-Fi Adapter
We highly recommend purchasing good quality cables from source listed below. Some cables sold on the open market are poor quality/design and could lead to complications during the flashing process.
ENET cables, Ethernet adapters and OTG USB adapters can be purchased on Amazon or eBay.
Shop MG Flasher:
MG Flasher’s ENET Wi-Fi Adapter
3. MG Flasher licenses
The MG Flasher flashing license along with OTS maps are available for purchase from our web store; shop.MGFlasher.com. Without purchase, you may utilize our support confirmation system to see if your car is supported (more info in section 6.2.1 Checking support via MG Flasher). You will need a flashing license and an OTS map of your choice:
Flashing license: In order to flash any OTS maps, a flashing license is required. This license allows an unlimited amount of flashing to the assigned vehicle (VIN locked). It also enables diagnostics and “Custom Flash” option. Original map will be available; it is automatically stored on your device and our servers with license activation. You will be able to restore the ECU back to stock software anytime using “Stock” button from the flashing screen.
OTS map: With Flashing License you can purchase and flash OTS maps that are available for your car: Stage 1, Stage 2, and coming soon Stage 3.
Full OTS map pack: This is the most convenient and economical all-in-one package. No hassle with upgrade fees in the future! This will allow you to switch between maps of your choice. Includes all available OTS maps for your car (VIN locked). In case you already purchased single OTS map and would like to update your OTS map to different (higher or lower) versions, you will be presented with the option for a Full OTS map pack at a discounted price.
Additional license/car can be activated on the same device (phone or tablet); licenses are related to VIN not Google/Apple account. MG Flasher can be used on another device once connected to the vehicle and to our server. Perfect in the event you replace your phone.
Buy license
1. Please Register account in our shop.
2. Go to Products page.
3. Add products to the shopping cart.
4. Proceed to Checkout and pay for your order via PayPal.
Redeem license
1. Run latest MG Flasher app on your mobile device.
2. Sign in using shop credentials using active internet connection.
3. Connect to your car using Connect button.
4. When you see basic data of your car please enable your internet access again.
5. Click Open Car button.
6. Select the Flashing license or OTS map that you bought in the shop from the list and click Redeem button. To redeem Logger, simply select “Logger”.
7. Confirm your selection before proceeding.
8. Your license will then be locked to your vehicle and it will be ready to flash!
For more details on this process, watch our instructional video: https://www.youtube.com/watch?v=S-a7PkJs8Y4.
4. Vehicle requirements and preparation for flashing:
THE FOLLOWING INFORMATION BELOW IS VERY IMPORTANT
4.1 Vehicle preparation
The following conditions must be fulfilled when flashing the ECU in the car and will facilitate a safe flashing environment with the least risk of failure.
*MG Flasher will only flash the engine management computer installed on the supported BMW vehicles.
Ensure your car have a well charged battery and furthermore one that is in good condition. We ask that if you have any outstanding concerns with the charging system of your car that you rectify these concerns before proceeding any further with any flashing procedure. Connecting your car to battery charger is highly recommended especially during the first flash (flashing time 4 – 6 minutes). After the initial setup OTS map flashes will take 15 -30 seconds. and will not require charger, however, we still highly recommend it. The charger should be connected to the designated charging points in the engine bay which can be found in your BMW User Manual. The Flasher is intuitive in the sense that it knows when the car battery is low and once it detects a low battery condition it will abort/prevent a start of the flash procedure. It is very important to keep the car battery within optimal voltage during flashing; we are not responsible for any damage to the ECU during flashing if above requirements are not met.
Make sure to turn off the radio, headlights, interior lights, AC/heating, heated seats as these are all electrical components that draw power from the battery. If you have installed any aftermarket components make sure to turn them off or disconnect them, this includes any piggyback hardware such as a JB4, which cannot be run in tandem with our software anyways.
Fasten the driver’s seat belt into its’ buckle as this will prevent the ignition from shutting off during the flashing process if you were to intentionally or unintentionally open or close your door.
If equipped, disable/turn off the in-car Wi-Fi hotspot.
4.2 MG Flasher application download
Make sure that you have the latest version of MG Flasher installed on your device (with storage permissions allowed on Android). If you have the latest version of Google Play/App Store and your account remains in good standing, go ahead and download MG Flasher for free. Please ensure your phone battery is adequately charged.
5. Flashing procedure
5.1 Hardware configuration
To ensure your hardware is properly configured follow the instructions in this section. The first thing you may notice on your Android screen is a notification of MG Flasher requesting permission to access your connected peripheral. You must accept these requests for MG Flasher to connect to your vehicle.
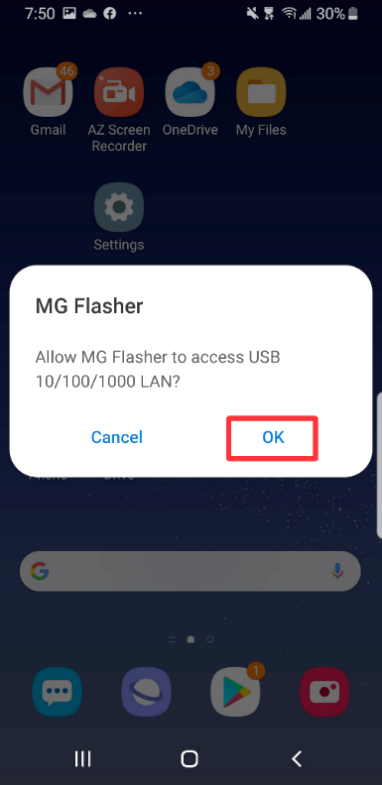
Accept permission request to grant MG Flasher access to your peripheral.
ENET Wi-Fi Adapter
Plug the ENET Wi-Fi adapter into OBD port, open your device settings, find the appropriate Wi-Fi network and connect. On iOS, ensure you enable Flight Mode. Please note, that you must return to your local Wi-Fi or LTE/4G with internet connection to be able to check for support or download/buy new maps and then switch back to the ENET Wi-Fi connection once more for flashing. Your device may have the option to be connected to both the ECU via Wi-Fi and use Cellular Data for internet access if prompted with the follow screen:
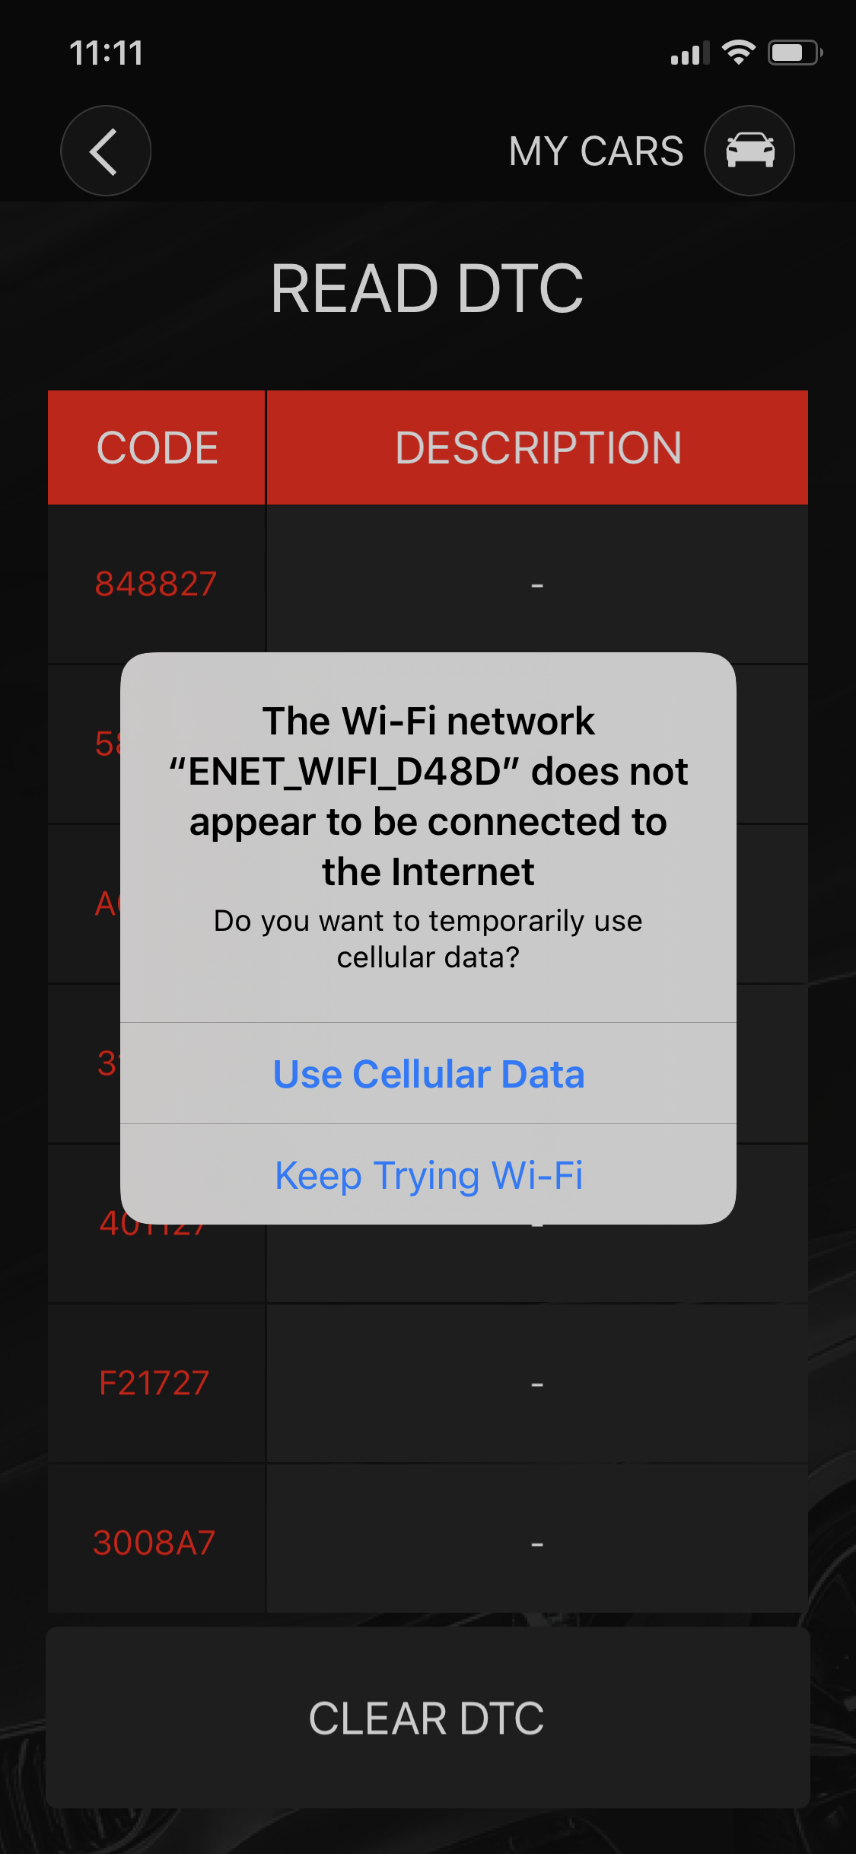
Select "Use Cellular Data" for internet access in order to download maps
ENET Cable
Please note, that you must return to your local Wi-Fi or LTE/4G with internet connection to be able to check for support or download/buy new maps and then switch back to the ethernet connection once more for flashing.
NOTE: Prevent flashing failure from mechanical stress on the USB connection by leaving you device on a flat surface.
iOS users should ensure Flight Mode is enabled and Wi-Fi disabled. The device should be ready to use, if not, configure your device to use an Automatic IP under “Settings” -> “Ethernet”.
Android users must configure the ethernet adapter before first use. Under “Settings” -> “Connections” -> “More Connection Settings” -> “Ethernet” set the Static IP to 169.254.250.250. Also confirm the following; Netmask: 255.255.0.0, DNS Address: 0.0.0.0 and Default gateway: 0.0.0.0. You may also need to disable Wi-Fi when connected with ENET cable.

In your device settings open “Connections” scroll down to “More connection settings” and open “Ethernet”.
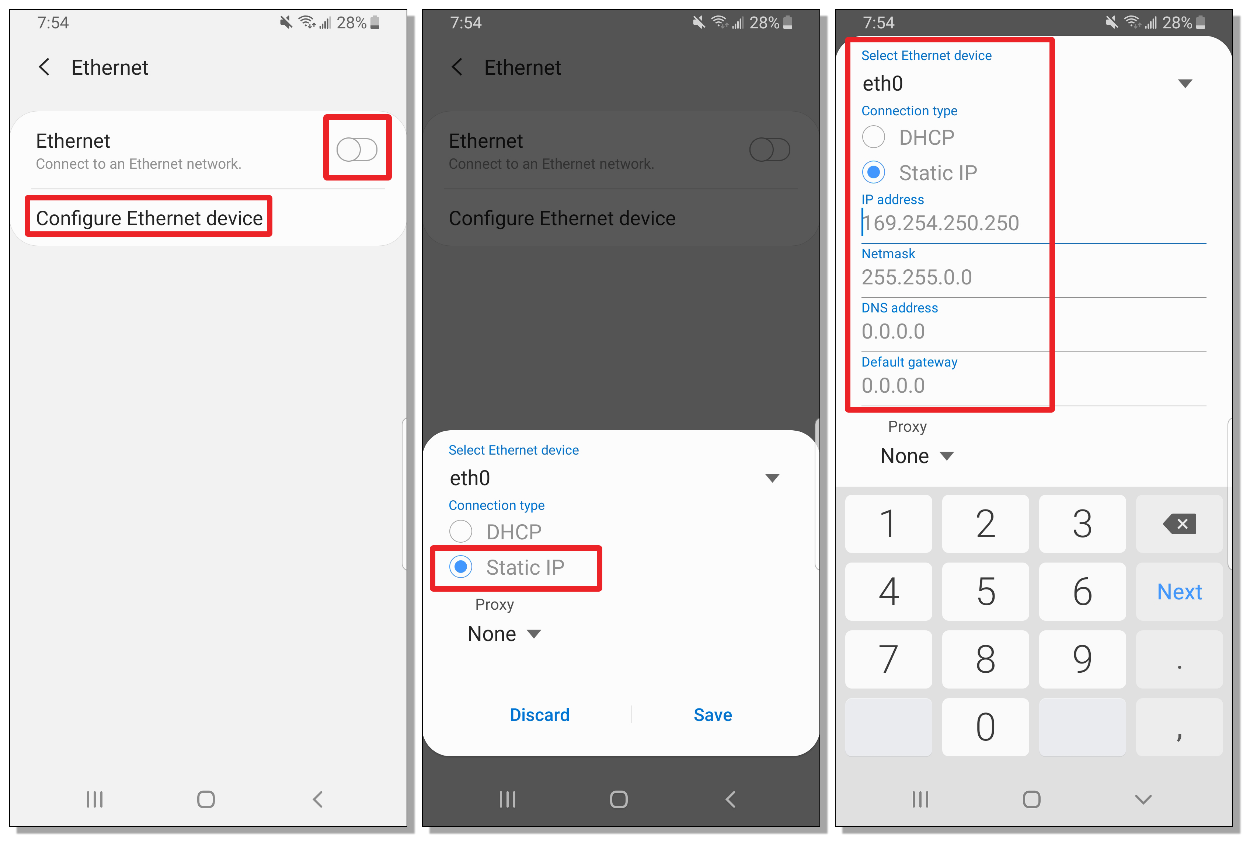
Tap to enable Ethernet, click "Configure Ethernet device", select "Static IP" and enter the IP addresses above. Save.
5.2 Hardware connections
Let’s review how to connect your newly purchased hardware to your smart device and BMW.
ENET Cable
Find the OBD II port (in the driver’s footwell) and plug in the ENET cable to the OBD II port. Connect the USB – Ethernet adapter to your device and the ENET cable to the adapter
ENET Wi-Fi Adapter
Locate the OBD II port (in the driver’s footwell) and connect the Wi-Fi Adapter to the OBD II port.

5.3 Connect to car and check for support via MG Flasher
Switch your device to Airplane mode and close any other running applications, as a phone call or any other application activity could interrupt the flashing procedure. For the initial flash procedure, connect vehicle to the charger as it will take 4 – 6 minutes. Each flashing procedure, after activation/unlock will take 15 -20 seconds and a car charger is not required.
Fasten the driver’s seat belt into its’ buckle as this will prevent the ignition from shutting off during the flashing process if you were to intentionally or unintentionally open or close your door.
Turn the ignition ON by pressing the START button twice without touching the brake.
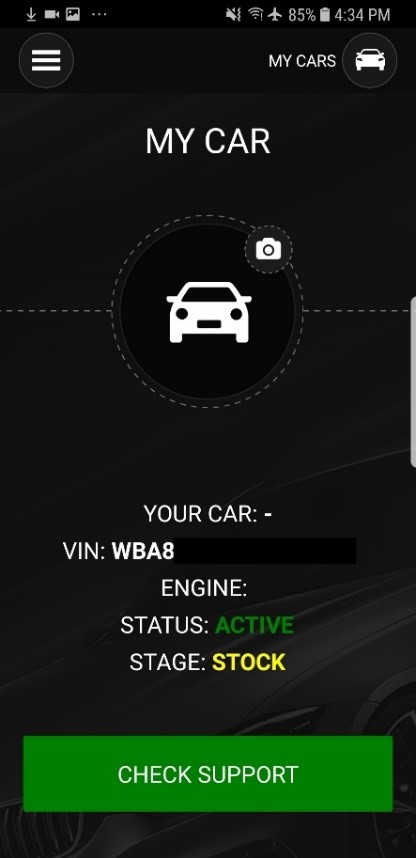
Start MG Flasher, and after the splash screen click “Connect”. Shortly after a successful connection, the main screen will show up with your car’s information: model, VIN, engine and actual status of the ECU: inactive or active following with actual stage installed (Stage 1, Stage 2, Stage 3, Stock)
At this point all the information is saved to the configuration file on your device.
5.3.1 Checking support via MG Flasher
Click “CHECK SUPPORT” and MG Flasher will check if your car is supported by connecting to our server
database. After confirmation a new screen will appear with all the available OTS maps/stages.
In a situation where your car is not supported, or our database has no available OTS maps for your car’s software level you will get following information:
Your software has been identified! We will require 1-2 business days to update the database and customize your file request to your needs. Thank you for your patience, if the file is still not available for download after a few days please contact us at supportmgflasher.com
5.3.2 Purchase flashing license and OTS maps
In order to flash any stages available for your car a flashing license must be purchased first. Click the “Redeem” button and follow the presented instructions (more information at “MG Flasher licenses”).
Once finished with your purchase the requested software is then downloaded from the server to your device. Now you are ready to unlock/flash your car!
5.4 Activate/unlock the ECU flashing procedure
Following conditions must be fulfilled when flashing ECU in the car, it will help to avoid flashing failures
Ensure you have a well charged battery and furthermore one that is in good condition. We ask that if you have any outstanding concerns with the charging system of your car that you rectify these concerns before proceeding any further with any flashing procedure. Connecting your car to a battery charger is highly recommended especially during the first flash (flashing time 4 – 6 minutes). After the initial setup any next OTS Stage Flashing will take up 15 -20 seconds and will not require charger however still highly recommended. The charger should be connected to the designated charging points in the engine bay which can be found in your BMW User Manual. MG Flasher is intuitive in the sense that it knows when the car battery is low and once it detects a low battery condition it will abort/prevent a start of the flash procedure. It is very important to keep the car battery within optimal voltage during flashing; we are not responsible for any damage to the ECU during flashing if above requirements are not met.
Make sure to turn off the radio, headlights, interior lights, AC/heating, heated seats as these are all electrical components that draw power from the battery. This is extremely important for the first long flash. If you have installed any aftermarket components make sure to turn them off or disconnect them, this includes any piggyback hardware such as a JB4, which cannot be run in tandem with our software anyways.
Fasten the driver’s seat belt into its’ buckle as this will prevent the ignition from shutting off during the flashing process if you were to intentionally or accidently open or close your door
If equipped, ensure to disable/turn off the in-car Wi-Fi hotspot
Switch your device to Airplane mode and close any other running applications, as a phone call or any other application activity could interrupt the flashing procedure. For the initial flash procedure, connect vehicle to the charger as it will take time 4 – 6 minutes. Each flashing procedure, after activation/unlock will take 15 -20 seconds and a car charger is not required.
Turn ignition ON by pressing the START button twice without touching the brake.
Select “Activate” button – a warning screen will appear to remind you about all vehicle and hardware condition/prerequisites to be checked – if all met you may confirm by “Flash”
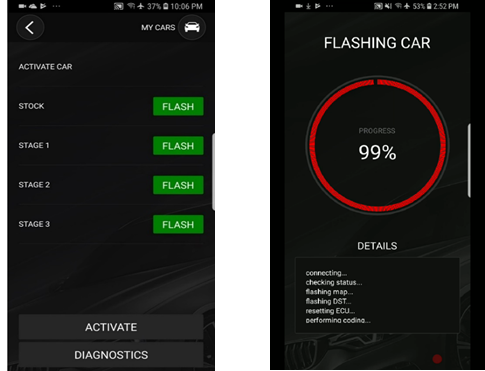
Activation flashing procedure will start, a progress bar will show you how far along the process is. During the procedure there will be error messages showing up on the car’s display and sounds from the dash which is normal.
Wait for the success message to appear then you may turn the ignition off, wait 15- 30 second, turn ignition ON and start the car. Congratulations, your ECU is unlocked!
5.5 OTS map flashing procedure - after successful unlock (short flash 15 – 20 seconds)
Ensure all vehicle preparations have been fulfilled (see this section)
Turn ignition ON by pressing the START button twice without touching the brake
Select the Stage you wish to flash and click on the “Flash” option - you will be presented with the various tune options like exhaust burble, cold start removal, vehicle speed limit removal etc. Pick what you need and then hit “Flash”.
Wait for the success message to show up. Turn the ignition off, wait 15 - 30 second turn ignition ON and start the car. At this time, you can exit back to the main menu and disconnect the cable. Enjoy your new tune!!
6.5.1 Flashing stock – original software
There will always be an original/stock flash available, it is automatically created with your license activation. You will be able to restore the ECU back to stock at any time using “Stock” button available from the Flashing screen – it is Stage 0, original factory software. ECU/Car remains activated/unlocked. Choose this option when you planning to visit service - flashing counter and CVN is kept the same (short flashing time of 15 – 20 seconds).
5.6 MG Flasher app navigation
After startup MG Flasher will welcome you with the splash screen and will switch automatically to the screen with the “Connect” button. This is the Main screen. If you have already connected the hardware with your vehicle (see this section) you may click “Connect” to establish
communication with your car.
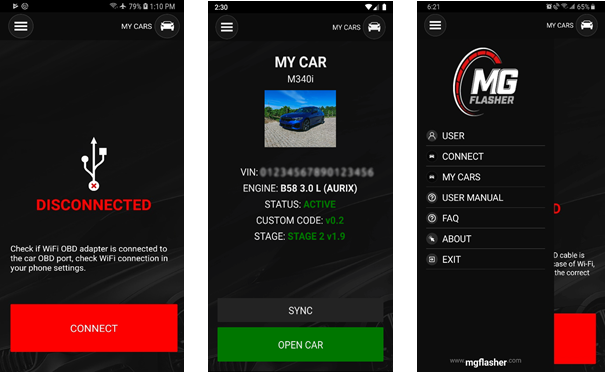
Side menu – menu is located on the top left, it gives access to User, Connect, My Cars, Logger, User Manual, FAQ, About and Exit.
User – Shows which user is logged in, and what licenses are available for redemption.
My Cars –it is a list of cars with active flashing license. Click on your activated car from the list to get to get all the information: VIN, engine, ECU status etc.
My Car - Main Screen menu with Flash button. Only accessible when connected to the car or under My Cars menu (top right) after car has activated license. Click on it to go to the Flashing screen.
Flashing – all available OTS maps, stock map, custom flash, activation, diagnostic, logger, purchases, are accessible here.
Diagnostic (see this section).
Logger (see this section).
6. OTS maps
In this app section you will see OTS maps available for your vehicle. Offered OTS maps are prepared with different octane levels and tested on our dyno and street with extensive logging. More information on OTS maps, Flashing License, OTS map pack (see this section).
MG Flasher perform synchronization check when is connected to the internet. Once there is update available for any OTS map you will see notification on the screen, or you can check it manually. To get the update you will need to click on currently active/available stage “Flash” button and choose octane level. If there is an update available MG Flasher will download updated OTS map to your device. You will see notification and progress bar on the screen.
6.1 OTS maps currently offered STAGE 1, STAGE 2
More information, including dyno diagrams, can be found on the website MG Flasher. E30 OTS maps are built into our latest OTS maps and accessed via the Switchable Maps custom code (minimum v5.1) feature available only for select vehicles.
Technical information:
NBT Display HP/TQ gauges calibration
Torque limiters
Lambda
Ignition timing optimization
Optimized for xHP transmission tuning software
Additional options available with each OTS map:
Exhaust burble adjustable on-the-fly*, set the intensity without reflashing!
Switchable maps on-the-fly*, select between maps (including ethanol blends) without reflashing!
Max Cooling on-the-fly*, and other cooling options
TCU Torque Limiter lifted (Gen 2 only)
Speed limiter removal
Cold start removal (off road use only)
Catalytic converter removal (dcat, off road use only)
Exhaust flap control
*Switchable maps are currently supported only on F-Series Gen 1 B58 vehicles. All Hybrid and Gen 2 “on-the-fly" options are in development, however, can be adjusted just before a reflash (15 -20 second when using ENET). Switchable ethanol maps will be temporarily unavailable until next update which will allow you to switch between multiple maps On-The-Fly!
OTS map – Stage 1
Gen 1 B48 engine (184 hp model): up to 290 hp and 420 Nm (310 ft-lb), delta of 95 hp and 138 Nm (102 ft-lb) from stock.
Gen 1 B48 engine (252 hp model): up to 305 hp and 430 Nm (317 ft-lb), delta of 53 hp and 80 Nm (59 ft-lb) from stock.
Gen 2 B48 engine (184 hp model): up to 310 hp and 430 Nm (317 ft-lb), delta of 58 hp and 80 Nm (59 ft-lb) from stock.
Gen 1 B58 engine: up to 412 hp and 573 Nm (423 ft-lb), delta of 69 hp and 85 Nm (63 ft-lb) from stock.
Gen 1 B58 engine (Stage 1+): up to 422 hp and 588 Nm (434 ft-lb), delta of 79 hp and 100 Nm (74 ft-lb) from stock.
Gen 2 B58 engine: up to 450 hp and 636 Nm (469 ft-lb), delta of 97 hp and 148 Nm (109 ft-lb) from stock.
Designed for the drivers who want the most out of their stock component vehicle. This software is intended to safely maximize your vehicle’s potential performance. The power curve has been delicately engineered to eliminate any dips in the overall powerband as well as maximizing delivery of that power throughout the entire RPM range.
OTS map – Stage 2
Gen 1 B48 engine (184 hp model): up to 320 hp and 445 Nm (328 ft-lb), delta of 136 hp and 175 Nm (129 ft-lb) from stock.
Gen 1 B48 engine (252 hp model): up to 335 hp and 465 Nm (343 ft-lb), delta of 83 hp and 115 Nm (85 ft-lb) from stock.
Gen 2 B48 engine (184 hp model): up to 340 hp and 470 Nm (347 ft-lb), delta of 156 hp and 200 Nm (148 ft-lb) from stock.
Gen 1 B58 engine: up to 442 hp and 635 Nm (468 ft-lb), delta of 99 hp and 172 Nm (108 ft-lb) from stock.
Gen 1 B58 engine (Stage 2.5): rated up to 500 hp and 700 Nm (516 ft-lb), delta of 157 hp and 237 Nm (156 ft-lb) from stock.
Gen 2 B58 engine: up to 495 hp and 680 Nm (502 ft-lb), delta of 152 hp and 217 Nm (142 ft-lb) from stock.
For the spirited drivers who want the maximum power out of their vehicle equipped with high flow downpipe or high flow catalytic converter. This software is intended to maximize your vehicle’s potential performance. The power curve has been delicately engineered to eliminate any dips in the overall powerband as well as maximizing delivery of that power throughout the entire RPM range.
91/95RON, designed to work with 93/98RON or greater for best results. Use only with catless downpipe or high flow catalytic converter. Gasoline particulate filter (OPF) must be removed if equipped.
Transmission tuning recommended:
The B46, B48 and B58 vehicles come equipped with an 8HP50 transmission where the factory torque limiter at the crank is set to 440 Nm (325 ft-lb) for B46/B48 and 550 Nm (400 ft-lb) for B58 vehicles.
Gen 2 vehicles: Software calibration without the need for any transmission tuning or skewing the torque/load calculation model maps. This allows for accurate calculations, smooth shifting and no software trickery. The factory torque limiter is set to 550 Nm (400 lb-ft) on B58 and 440 Nm (325 lb-ft) on B48 at the crank. We are the first to offer a solution to lift this limit up to 1000 Nm by using our custom code! The limit is adjustable in app.
Gen 1 vehicles equipped with an 8HP50 transmission will have a torque limiter. For the best results and proper smoothing of the torque curve without any transmission related torque intervention we have found that is best to increase the limiter within the transmission software. We present you with two options to implement this on your vehicle:
Option 1: Lifting the limiter in the transmission ECU which can be done for example with xHP Flashtool
Option 2: Bringing the car to our shop or another tuner for reprogramming of the transmission ECU limiters
Products offered are available for closed course competition use only
7. Custom flash
Custom Flash option allows you to flash your vehicle with custom maps prepared by other tuners/users or if you prefer MG Flasher as your tuner source, we can deliver custom software per individual request.
With Custom Flash option you receive free access to adjust parameters like exhaust burble, speed limiter removal, cold start removal (off road use only), catalytic converter delete (dcat, off road use only), etc. Those options can be adjusted anytime from your device.
Flashing License activation is required to be able to access Custom Flash option. Activate/Unlock the ECU flashing procedure must be done before using Custom Flash option (see this section).
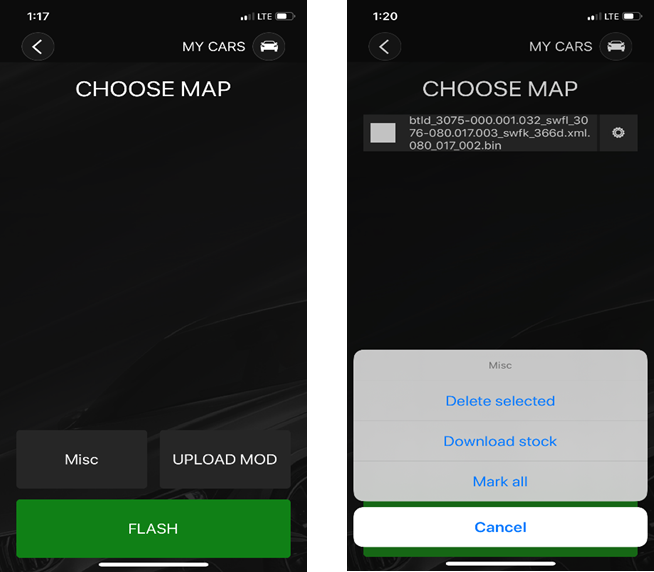
This is an example of how a stock file is named when using our app: “btld_3075-000.001.032_swfl_3076-080.017.002_swfk_3c9a.xml.080_017_001”. The original file is available after the car is activated in MGFlasher/Maps folder on your device (Android only), they can also be shared via cloud to your computer.
In order to flash custom tune
Press “Custom Map” button in the Flashing menu, click “Continue” to show available files.
Download stock file to your device and share it to your computer.
Use your favorite editor to apply your custom tuning.
Do not perform and checksum calculations, MG Flasher will do this for you during upload.
Save the file with any name you like for example: “Stage1.bin”, “customfile1”. Make sure you can easily recognize later.
Upload custom tune file/files to your device using “Upload Mod” button on the “Custom Map” page.
Select the file you wish to flash.
Connect device to the vehicle.
Ensure all vehicle preparations have been fulfilled (see this section).
Turn ignition ON by pressing the START button twice without touching the brake.
Select the tune you wish to flash and click “Continue to Custom Options” - you will be presented with the various options like exhaust burble, cold start removal, speed limiter removal, etc. Pick what you need and then hit “Continue”. You can flash as many customs maps as you like and switch between them.
Before flashing, a check of your custom tune will be performed, and all checksums and RSA corrections calculated. Flashing process will start, do not disconnect your phone, do not exit app, do not turn the ignition off during that time.
Wait for the success message to show up. Turn the ignition off, wait 15 - 30 second turn ignition ON and start the car. At this time, you can exit back to the main menu and disconnect the cable. Enjoy your new tune!!
To switch back to stock map please follow instruction (see this section).
8. Switchable maps On-The-Fly (our unique custom code)
Our custom code v5.1 allows to switch between OTS Octane, Ethanol blends map, new Stage 2.5 (HPFP upgrade required) without the need to reflash the vehicle! Through a simple combination of the Brake Pedal, Accelerator Pedal, Traction Control Button and the Driver Select Switch you can quickly select between mapping. Support is currently only for F-Series Gen 1 B58; support for B48 and G series will be available soon.
Existing users, please synchronize your App and update/flash new maps. Just before flashing you will be informed that the procedure will take approximately 3 – 4 minutes. This is a one-time flash that will not occur again unless new updates are released in this specific new code. Minimum OTS map version 2.11 is required to access Switchable Map option. Tuners should contact us about accessing Switchable Maps when using “Custom Flash Menu”.
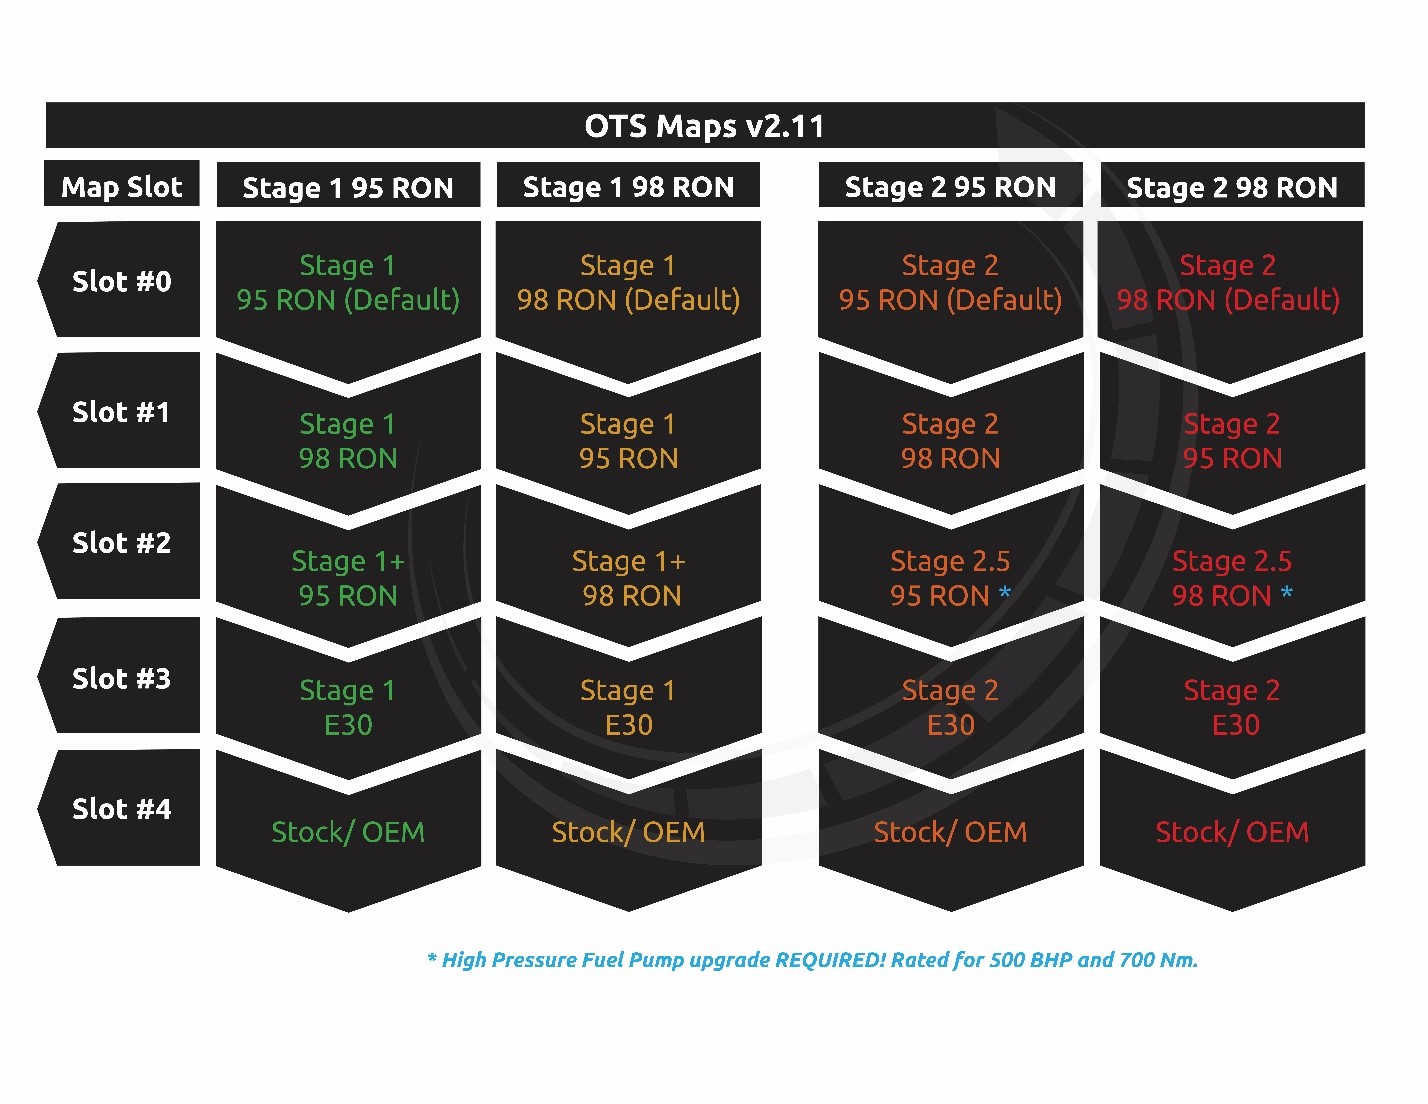
Upgraded High Pressure Fuel Pump support has also been added. From the flashing menu, select the HPFP Installed option for B58TU pump, Spool Performance FX-150 & FX-180 or Dorch Engineering Stage 1 & 2. This will allow the ECU to properly control the pump. To gain any performance benefits of these high flow pumps, you’ll also need to select a Stage 2.5 map (part of Switchable Maps option). Please refer to OTS map release notes for which map slot contains Stage 2.5.
When using Stage 2.5, it is required to have an upgraded HPFP (B58TU, Spool Performance FX-150 and FX-180 or Dorch Engineering Stage 1 and 2) and downpipe. To prevent unintentional damage, do not switch to this map without installing these upgrades and selecting HPFP Installed in the flashing menu first.
Watch our instructional video on YouTube to see how it works and read below for more info!
F and G series B58 vehicles: https://www.youtube.com/watch?v=2DSUhvuXu9c
Switchable map can be only be achieved under the following conditions:
1. Switchable maps must be available and enabled in your software (selected during flashing process). Only available on F series Gen 1 B58 currently. B48 and G series will be available very soon.
2. Engine must be running (more than 30 seconds from start).
3. Vehicle must be at a standstill.
Switching Between Maps
1. Press the Brake Pedal 5 times consecutively within 5 seconds and then hold the Brake Pedal on the 5th press. You should notice the Check Engine Light begin to blink; this is a confirmation marker that tells you if you have performed this first step correctly. If you do not encounter a blinking Check Engine Light, then you must check the condition listed above and retry Step 1.
2. While the Check Engine Light is blinking, fully press and hold the Gas Pedal to W.O.T (wide open throttle) position. The actual engine RPM WILL NOT rise during this procedure, so there will be no chance of over-revving the engine. The RPM gauge will immediately point to the currently saved map-set (ie. 2000 RPM = Slot #2). If no map-set was previously selected, then you will see RPM go directly to a value of 0 indicating the default map-set. Steps 1 & 2 allow the user to see the currently selected map-set.
3. To select a new map-set, fully press and hold the Gas Pedal to W.O.T (while still pressing the Brake Pedal from Steps 1 & 2) for a period of 5 seconds or longer. The map-set will coincide with the current state of the Driver Experience Switch and MSA Button.
• ECO = Slot #1 (1000 RPM)
• COMFORT = Slot #2 (2000 RPM)
• SPORT = Slot #3 (3000 RPM)
• SPORT+ = Slot #4 (4000 RPM)
• SPORT or SPORT+ and 2 quick MSA presses = Slot #0 (0 RPM) (Default)
Important! when switching to Slot #0 (default) after rpm gauge switch to 0 RPM you must release gas pedal within 5 seconds , if you hold it for longer time the ecu will switch to Slot #4
In case your BMW does not have SPORT+ mode you will be limited to Slot #1, #2, #3 and reverting to Slot #0 is possible from SPORT mode by the same sequence - SPORT and 2 quick MSA presses
Within the 5 seconds of holding the Gas Pedal at W.O.T position (while still holding the Brake Pedal) you will notice the RPM on the dash will reflect the choice you have selected (ie. 3000 RPM = Slot #3).
4. Release the Brake and Gas Pedals fully to exit the selection process. RPM on the dash will return to actual engine RPM and the Check Engine Light will stop blinking. Now you can enjoy your newly selected map-set!
9. Dynamic burble On-The-Fly (our unique custom code)
Existing users, please synchronize your app and update/flash new maps. Just before flashing you will be informed that the procedure will take approximately 3 – 4 minutes. This is a one-time flash that will not occur again unless new updates are released in this specific new code.
New Users will receive automatic activation when car/ECU is unlocked with the flashing license.
This option is also available for stock maps and custom tunes with the purchase of a flashing license.
With this function, flashing your car every time you want to adjust the intensity of the burbles will be a thing of the past! Via a simple combination of the Driving Experience Switch and the MSA button you can change the intensity of the burbles ON THE FLY!
There are 4 burble levels available. With some feedback from our Beta testers we have also added "Burble OFF Mode" for those of you who want to remain in Sport and Sport + without burbles active.
Watch our instructional video on YouTube or Facebook page to see how it works and read below for more info!
NOTE: Video is outdated. Switching requires 4 MSA presses and to return to default requires 6 presses in any mode. F and G series share the same instructions now.
Important notes:
The car must be running for this function to work.
The car must have been running for longer than 30s to begin selecting as described below.
The car must be above 50-degree coolant temperature for burbles to activate.
Drive Mode must be enabled; manual mode deactivates the selection process.
You must press the MSA button the required number of times within 2.5 seconds for it to be a valid selection.
The burble level adjusted by the Aggressiveness Slider during your last OTS map flash will be the default aggressiveness adjustment without any of the above-mentioned selections. This "default" mode will be activated each time when vehicle is started after sleep mode.
CEL will brink twice quickly when enabled and solid when default settings are restored.
Application details:
Level 1 - Switch to ECO Mode via the Driver Experience Switch and push the MSA button four times within 2.5 seconds. The Check Engine Light will blink twice as the confirmation. Then you must return to Sport Mode or Sport Mode+ to hear the changes. This level will be equivalent to the aggressiveness at 20%.
Level 2 - Switch to Comfort Mode via the Driver Experience Switch and push the MSA button four times within 2.5 seconds. The Check Engine Light will blink twice as the confirmation. Then you must return to Sport Mode or Sport Mode+ to hear the changes. This level will be equivalent to the aggressiveness at 40%.
Level 3 - Switch to Sport Mode via the Driver Experience Switch and push the MSA button four times within 2.5 seconds. The Check Engine Light will blink twice as the confirmation. The changes should be heard immediately, given that you are already in Sport Mode, where burbles are active. This level will be equivalent to the aggressiveness at 70%.
Burble OFF - Switch to Sport Mode+ via the Driver Experience Switch and push the MSA button four times within 2.5 seconds. The Check Engine Light will blink twice as the confirmation. Burbles will now be fully deactivated.
Default Mode – To switch back to your stock/default settings (aggressiveness level depends on your slider positions) in any Mode (ECU, Comfort, Sport, Sport+) and push the MSA button six times within 2.5 seconds. The Check Engine Light will blink solid as the confirmation.
NOTE: All Gen 2 “on-the-fly" options are in development, however, can be adjusted just before a reflash (15 -20 second when using ENET).
10. Max Cooling On-The-Fly (our unique custom code)
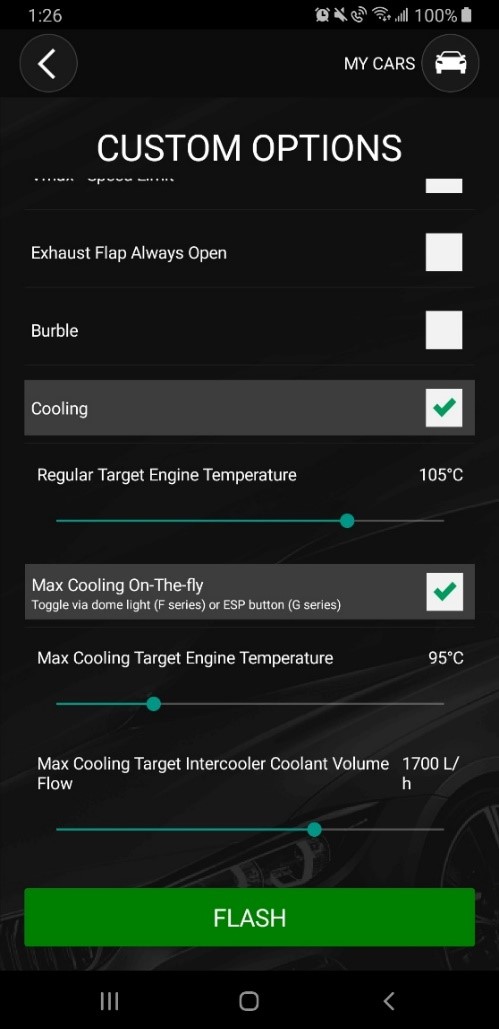
Introducing MG Flasher’s latest feature: Max Cooling On-The-Fly. With a simple button combination sequence, you can enable the Max Cooling option without re-flashing the car!
There will now be two option available for cooling your engine: Regular cooling and Max Cooling. Use “regular cooling” with regular driving, then switch to “Max Cooling” with a quick and easy button sequence. Max Cooling is achieved by lowering the target engine temperature and increasing the target intercooler coolant volume flow.
Watch this clip and see how it works on our F series car! https://youtu.be/0Du7T0O_qDI
The update will require to reflash your ECU using newest MG Flasher. You will be presented with popup information when flashing (min custom code update v3.4). Before flashing, there will be a few options to select. “Cooling” will enable you to choose the “Regular Target Engine Temperature” as preferable for everyday driving - that is set when Max Cooling On-The-Fly is not enabled. This will then allow you to enable adjustable “Max Cooling On-The-Fly” which will present two sliders: “Max Cooling Target Engine Temperature” and “Max Cooling Target Intercooler Coolant Volume Flow” both settings used when Max Cooling On-The-Fly is on.
Target engine temperature and intercooler coolant volume flow will change between your slider settings (configured before flashing) and the default values when toggling Max Cooling On-The-Fly. OEM target engine temperature is 110°C and the OEM intercooler coolant volume flow is 1500 L/h under full load operation. You can adjust the values from 90°C - 110°C and from 1500 L/h – 1800 L/h.
F series vehicles (Driver’s door must be closed):
To enable Max Cooling On-The-Fly – Switch to Sport Mode+ or Sport Mode via the Driver Experience Switch and push the Dome Light button twice within 2.5 seconds. The Check Engine Light will blink twice as a confirmation.
To disable Max Cooling On-The-Fly – Switch to Sport Mode+ or Sport Mode via the Driver Experience Switch and push the Dome Light button twice within 2.5 seconds. The Check Engine Light will blink once as a confirmation.
G series vehicles (Driver’s door must be closed):
To enable Max Cooling On-The-Fly – Sport Mode+ or Sport Mode via the Driver Experience Switch and push the ESP button four times within 2.5 seconds. The Check Engine Light will blink twice as a confirmation.
To disable Max Cooling On-The-Fly – Sport Mode+ or Sport Mode via the Driver Experience Switch and push the ESP button four times within 2.5 seconds. The Check Engine Light will blink once as a confirmation.
NOTE: All Gen 2 “on-the-fly" options are in development, however, can be adjusted just before a reflash (15 -20 second when using ENET).
11. Diagnostic
This segment is dedicated for diagnosis, troubleshooting, reset adaption, restore coding, restore backup It contains following modules:
ECU info – all information regards ECU software and coding.
Read DTC – read all supported codes from the ECU with their description for troubleshooting.
Clear DTC.
Reset ECU.
Reset adaptation - select to reset various adaptations such as mixture adaptation, VANOS, fuel system, Valvetronic Lift and increment wheel.
Restore coding – when the original coding is lost or corrupted or during the flashing was not performed you can restore coding manually. Go to “ECU info” to check coding status. Check the last position on the list example CAFD.X.X.X.
Restore backup – flash/restore complete backup, uninstall MG Flasher and relock ECU. It will lock your ECU and increase flashing counter - flashing time 4 minutes.
Do not use this function unless allowed by our support!
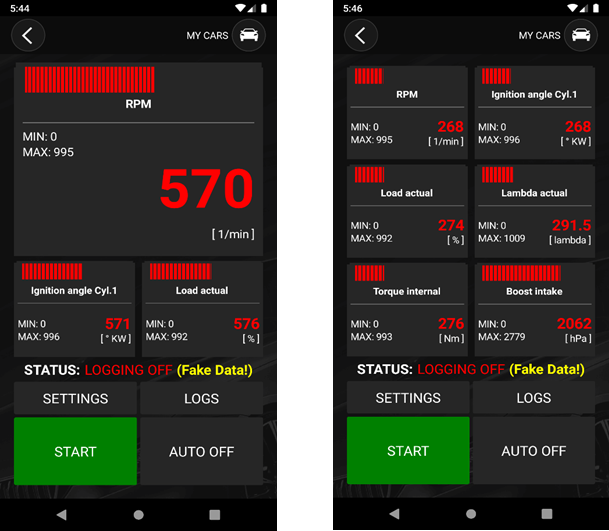
12. Logger
This section of MG Flasher allows you to log real time data and plot them into graphs for troubleshooting and optimizing. Logger is additional function available in MG Flasher. You can get Logger as additional product once Flashing license is already activated.
If you select logging from the main screen, you will be presented with an option to start/stop a log
Auto logging function – when you press “Auto ON” logger will automatically start logging while you press the accelerator pedal faster which and stop logging when the pedal will be released for longer than 2 seconds
Data settings - select add/remove the data that needs to be logged from available submenu list – default data is already preset with main parameters required by us if support needed.
After stopping the logging process, the logs will be stored under view log
Data will be saved to *.csv format and can be exported or share for viewing and analyzing in different software or applications – diagram plotting in MG Flasher App will be added with further updates soon.
The log should consist of a full acceleration drive at WOT (wide open throttle) across a large rpm range in a gear that is closely matching the engines output shaft rotational speed. To do this:
(Optional) It is recommended to attach your phone to the window or similar location using a holder for easy access to start/stop logging if need be.
Align the car on a long straight path.
Put the vehicle in Sport+ mode, with the shifter on the left (you will need to manually shift).
Slowly drive the vehicle until you reach 4th gear just under 2000 rpm and stabilize your speed.
Press start button 2-3 seconds before WOT (wide open throttle) to begin logging. You can start logging early and end well after the pull to ensure the full acceleration period is recorded. Optionally, press Auto button to enable automatic logging.
Enter full acceleration with WOT (wide open throttle) from 2000 rpm up until 6200-6800 rpm (if possible).
Press stop button to end log. When Auto enabled, logger will stop recording and resume when pedal is pressed WOT again.
Repeat the process in 3rd gear at 2000 rpm with a manual shift to 4th gear at 6000 rpm or higher.
This should give you two logs, 4th gear WOT and 3rd-4th gear WOT with shifting.
Automatic logging, as opposed to manually starting/stopping the logging session, is up to your preference. Logging is typically used to see how a vehicle is performing or to find problems with mechanics/software. If you require our analysis of this data, you can email us these two logs along with your VIN to info@mgflasher.com.
Please read the disclaimer on our website or the Terms and Conditions section of this document before using our product and be fully responsible while doing logs and exceeding allowed speed in your region.
13. Troubleshooting
Unlock procedure failed, programming was not successful
Don’t panic, just retry the unlock/activate flashing procedure again. MG Flasher is designed to keep programming process of your ECU safe, it will perform proper programming steps and correct errors